Language
Are you tired of battling with ceramic tiles, feeling like you're trying to cut through solid rock with a butter knife? Well, fear no more, because there's a tool that can be your knight in shining armor. Enter the ceramic tile grinding wheel, a mighty companion that can conquer the toughest of tiles with ease. But how does it work? What makes it different from other tools? And most importantly, how can it transform your tile cutting experience? Stay tuned as we unveil the secrets behind this powerful tool and unveil the wonders it can bring to your tile cutting endeavors.

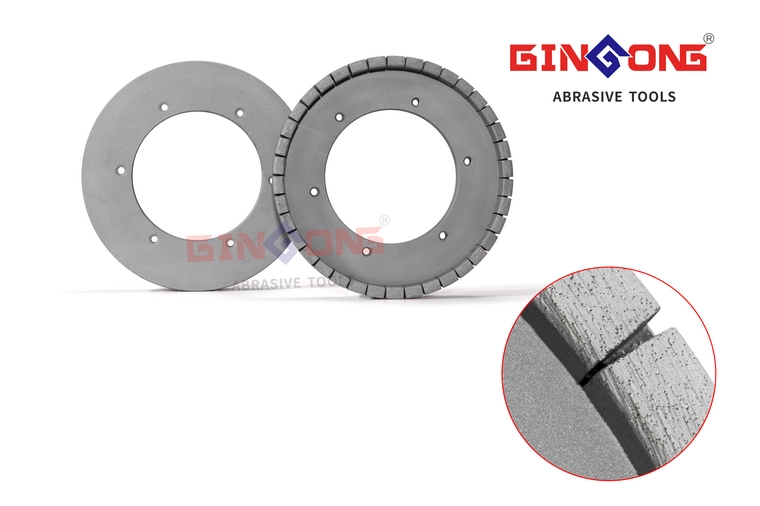
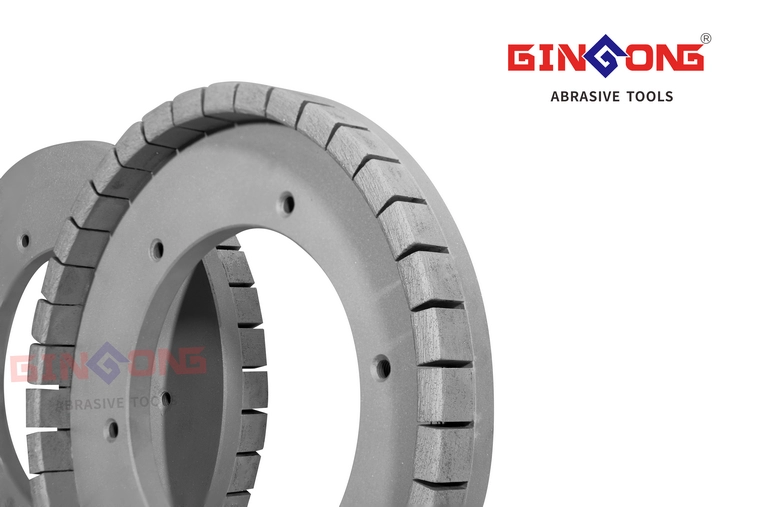
A tile grinding wheel is an essential tool used to achieve precise and clean cuts on fragile tiles without causing damage or chipping. It is designed specifically for cutting tiles and is a crucial component in tile cutting techniques. When using a tile grinding wheel, it is important to follow safety precautions to ensure a successful and safe cutting process. Selecting the right blade for the job is crucial, as different blades are designed for specific tile materials and cutting techniques. Common problems that may arise during tile cutting include wheel wear, glazing, loading, wheel breakage, and inefficient grinding. To prevent and troubleshoot these issues, regular grinding wheel maintenance is necessary. This includes proper installation, regular inspection, appropriate usage, cleaning and storage, and following manufacturer guidelines. By following these steps and maintaining the grinding wheel properly, you can achieve precise and clean cuts on fragile tiles without damage or chipping.
To cut circles with an angle saw, position the grinder at a 30° angle and slowly chip away at the tile layer by layer. This technique requires patience and skill to achieve a clean circle. For cutting small holes, use the plunge cut method by plunging the grinding wheel onto the back of the tile to create a straight cut line.
When cutting circles in tiles using an angle saw equipped with a grinding wheel, hold the grinder at a 30° angle and chip away at the tile layer by layer to achieve close to perfect holes. Here are some tips and techniques to help you cut circles with an angle saw:
Remember to wear safety gear, such as safety glasses and a dust mask, and work in a well-ventilated area. With practice and patience, you can achieve precise and clean circles in your tiles using an angle saw and grinding wheel.
Cutting small holes in tiles with an angle saw equipped with a grinding wheel requires a different technique than cutting circles, but it is still achievable with practice and precision. To get small holes in tiles, you can use the plunge cut method. Start by plunging the grinding wheel onto the back of the tile, creating a straight cut line that penetrates it completely. Then, use the angle technique on the back to get a clean circle. It's important to exercise patience and skill when cutting smaller holes with an angle saw. Additionally, consider alternative methods such as using a glass cutter, carbide tipped pen, manual tile cutter, or wet saw. Always follow safety precautions and best practices to ensure successful results.
For precise and efficient cutting of smooth straight lines in tiles, the diamond grinding wheel is the ideal tool to use. Here are some important tips and techniques to consider when using a grinding wheel for cutting smooth straight lines in tiles:
To cut ceramic tiles with an angle grinder, you need to select the appropriate blade, install it correctly, and design your cut. Easy cut directions involve wearing protective gear, applying light pressure to score the tile, and angling the grinder back and forth until the blade cuts through. For complex cuts, mark an outline on the glazed surface, divide the cut into smaller sections, and trim the unfinished edge to fit.
When selecting the appropriate angle grinder blade for cutting ceramic tiles, it is crucial to choose a tile-cutting blade that is specifically designed for this purpose. Here are some important factors to consider:
To properly cut ceramic tiles with an angle grinder, you need to start by installing the blade on the angle grinder in the correct orientation. When installing the tile-cutting blade, ensure that it is pointing in the same direction as the tool. It is possible to cut tile with a blade that has been put in reverse, but this can cause the edge to lose diamonds and reduce durability. Check that the brass arbor bushing on the blade centers it on the grinder's arbor. The bushing maintains the edge in the center. After adjusting the arbor nut by hand, lock the blade into place and use the grinder's spanner wrench to finish tightening the nut. By following these installation steps, you can ensure that the blade is properly aligned and secure for cutting ceramic tiles.
When designing the cut for ceramic tiles with an angle grinder, it is important to consider the dimensions and plan for straight or angled cuts, as well as more intricate cuts like curves and holes. To achieve the desired results, follow these tips:
Cutting intricate patterns:
Finishing edges smoothly:
Achieving precise curves:
To easily cut ceramic tiles with an angle grinder, it is important to follow proper safety precautions and techniques. First, put on a dust mask, ear protection, and safety glasses to protect yourself. Firmly hold the angle grinder with one hand and turn it on at full throttle. If the blade vibrates erratically, shut off the grinder immediately. Apply light pressure while rubbing the blade against the tile's line, scoring a 1/16-inch deep groove. Angle the grinder back and forth continuously until the blade cuts through the tile, making sure to keep the blade in one place. Finally, grind any sharp edges away from the blade's side. Following these grinding techniques and safety precautions will ensure a smooth and precise cut.
Now that you have mastered the easy cut directions for cutting ceramic tiles with an angle grinder, let's delve into the more complex cut directions to achieve intricate and precise cuts. When cutting complex shapes, it is important to follow advanced cutting techniques and troubleshoot any grinding wheel issues that may arise. Here are some key points to consider:
To cut tiles with a grinder, start by preparing the grinder and clamping the tile to a work surface. Use a pencil or marker to mark the cutting line, then start the grinder and slowly cut along the marked line. Remember to use slow speed settings and apply light pressure to ensure a clean and precise cut.
Before you begin cutting tiles with a grinder, it is crucial to ensure that the grinder is in good working order and that the power cord is free from any damage. To prepare the grinder for cutting tiles, follow these steps:
Secure the tile firmly to a stable work surface using clamps to prevent any movement during the cutting process and ensure accurate and safe cuts with your grinder. Clamping the tile is essential for work surface stability, preventing tile damage, and maintaining control over the cutting process. Without proper clamping, the tile may shift, resulting in inaccurate cuts and potential accidents. Additionally, clamping helps to control dust and debris by keeping the tile in place and minimizing vibrations. When clamping the tile, choose a sturdy and stable work surface that can support the weight of the tile and the grinder. Ensure the clamp is tight enough to hold the tile securely, but not too tight to avoid damaging the tile. By following these tile clamping techniques, you can achieve precise and safe cuts while maintaining control over the grinder.
To ensure accurate and precise cuts, it is essential to mark the cutting line on the tile using a sharp pencil or marker. Here are some tips to help you achieve cutting accuracy and prevent the grinder from slipping:
To start cutting tiles with a grinder, activate the grinder by using the switch on the side, ensuring that you have already equipped yourself with safety glasses and a dust mask for protection against dust and debris. Once the grinder is on, adjust the speed setting to a low-speed setting, gradually increasing it as needed. It is important to slowly cut along the marked line of the tile to prevent the grinder from slipping or damaging the tile. Cutting too quickly can result in inaccurate cuts and may cause the grinder blade to chip. By taking your time and using a slow cutting speed, you can ensure precise and efficient cutting techniques while designing patterns on your tiles. Remember to always follow safety precautions and practice proper blade maintenance for optimal results.
To achieve precise and accurate cuts when using a grinder to cut tiles, it is essential to use slow speed settings and apply light pressure. This cutting technique helps prevent the grinder from overheating and minimizes the risk of chipping or damaging the tile. Here are some key points to consider when using slow speed settings and applying light pressure:
When using a grinder to cut tiles, it is crucial to cool the blade frequently to prevent overheating and ensure optimal cutting performance. Cooling the blade is important for several reasons. Firstly, it helps to prolong the life of the grinding wheel, saving you money in the long run. Secondly, an overheated blade can be dangerous as it may break or chip, resulting in accidents and damage to the tile. Additionally, cooling the blade can reduce the production of fine dust, which is harmful to breathe in. To cool the blade, you can spray it with water or use a wet sponge. By following these best practices for cooling the blade, you can achieve better cutting results and maintain the safety and efficiency of your grinder.
Remove the blade from the work surface once you have successfully cut through the tile to ensure safety and prevent accidental contact with the blade. Leaving the blade unattended can lead to potential injuries if someone or something comes into contact with it. Additionally, storing the blade properly is essential to maintain its condition and longevity. Here are some tips for storing the grinder blade:
In addition to proper storage, maintaining and sharpening the grinder blade is crucial. Here are some best practices for cleaning and sharpening the blade:
Remember to follow the manufacturer's instructions for maintenance and storage to ensure optimal performance and safety. Signs that indicate the blade needs to be replaced include excessive wear, loss of cutting efficiency, or visible damage. By following these tips and guidelines, you can prolong the life of your grinder blade and ensure safe and effective cutting of tiles.
When using a tile grinding wheel, there are several tips that can help you achieve the best results. First, it is important to work in a well-ventilated area to avoid complications and irritability. Additionally, when cutting tiles on the wall, make sure to mark out your pattern accurately and use a slow and steady motion to prevent any mistakes or damage to the tiles.
To ensure your safety and minimize the risk of complications and irritability, it is essential to work in a well-ventilated area when using a tile grinding wheel. Choosing proper ventilation is crucial in controlling the health risks associated with the dust and particles generated during the grinding process. Here are some tips for maintaining a well-ventilated workspace:
When using a tile grinding wheel, it is possible to make clean cuts in tiles that are still mounted on the wall by utilizing an angle grinder. This technique is especially useful when designing patterns or cutting curves in the tiles. However, it is important to prioritize grinding safety and choose the right tile for the job. Make sure to wear a dust mask and safety glasses to protect yourself from any debris. Additionally, select a tile that is suitable for grinding and cutting, such as ceramic or porcelain. Troubleshooting common issues, such as wheel wear or glazing, is also essential to ensure optimal performance. By following these tips and precautions, you can achieve precise and professional results while cutting tiles on the wall.
To achieve precise and professional results when using a tile grinding wheel, it is essential to mark out your pattern before cutting into the tile. Taking the time to design and mark your pattern will ensure cutting accuracy and help you achieve the desired outcome for your project. Here are some design techniques and safety precautions to consider when marking out your pattern:
When using a tile grinding wheel, it is crucial to maintain a slow and steady motion to ensure accurate and precise cuts. This slow cutting technique allows for better control over the grinder and reduces the risk of damaging the tile. To further enhance your cutting experience, it is important to select the proper blade for your specific tile material. Diamond blades with continuous particles are recommended for the best results. Additionally, implementing cooling methods, such as using water or a coolant, can prevent overheating and prolong the life of the grinding wheel. When cutting, consider the optimal cutting angle to achieve the desired shape or pattern. Lastly, always prioritize safety precautions by wearing protective gear, such as safety glasses and gloves, and ensuring the grinder is securely clamped to a stable work surface.
| Slow Cutting Technique | Proper Blade Selection | Cooling Methods | Cutting Angles | Safety Precautions |
|---|---|---|---|---|
| Maintain a slow and steady motion for accurate cuts | Select diamond blades with continuous particles | Use water or coolant to prevent overheating | Consider optimal cutting angles for desired shape | Wear protective gear and secure the grinder properly |
When choosing the right grinding wheel for your ceramic tile project, there are several important factors to consider. First, you need to choose the appropriate abrasive material, such as ceramic aluminum oxide or diamond, based on the hardness of your tiles. Next, selecting the right grit size is crucial for achieving the desired finish and removing the necessary amount of material. Additionally, understanding your wheel's bond grade and referencing the stock and material to be removed will ensure optimal performance and longevity of the grinding wheel.
Are you unsure of which abrasive material to choose for your grinding wheel? Selecting the right abrasive is crucial for achieving optimal grinding results. Understanding the properties of different abrasive materials and comparing them will help you make an informed decision. Here are some key points to consider:
Advantages of ceramic abrasives:
Comparing different abrasive materials:
Best practices for using abrasive materials:
To ensure the best results for your grinding project, it is crucial to pick the right grit size for your grinding wheel. The grit size is indicated by a number on the grinding wheel, which tells you the number of openings between each abrasive grain. A higher grit number means more smaller openings, while a lower grit number means fewer but larger openings. When choosing the grit size, consider factors such as the material you're grinding and the amount of material you need to remove in one pass. Coarse grits, with a lower number, are best for removing a lot of material, while finer grits are used for achieving a smooth finish. Selecting the right grit size is important to avoid damaging your workpiece and to ensure efficient grinding.
Knowing the bond grade of your grinding wheel is crucial when it comes to choosing the right wheel for your specific grinding needs. The bond grade refers to the strength in which the abrasives are held to the wheel. Here are some key points to consider when selecting the bond grade for your grinding wheel:
Selecting the appropriate bond grade is essential for the success of your project and the longevity of your tools. Using the wrong grade can result in longer grinding times and unnecessary stress on your wheel. Proper bond grade selection ensures optimal grinding wheel performance, durability, and safety.
When selecting the right grinding wheel for your project, it is important to reference the stock and material that needs to be removed. The amount of stock removal required will determine the grit size of the wheel. For projects that require a significant amount of stock to be removed, a coarse grit wheel, typically around 12 to 24 grit, is recommended. This will ensure efficient material removal and save time. On the other hand, if you are looking to achieve a smooth surface finish, a higher grit size wheel is needed. The higher grit size will allow you to buff out any imperfections in the material, resulting in a smooth and polished surface. It is crucial to choose the optimal grit size to achieve the desired surface smoothness and grinding efficiency.
Now let's delve into some of the common issues that can arise with grinding wheels. Wheel wear is a gradual erosion of the abrasive surface, resulting in reduced cutting efficiency and a poor surface finish. Glazing occurs when the wheel's surface becomes smooth and glossy, diminishing its grinding ability. Loading is another problem that can occur, causing the wheel's surface to become clogged with the material being ground, leading to overheating and loss of accuracy. Wheel breakage is a serious issue that can result in tool damage and personal injury, while inefficient grinding can slow down material removal and affect overall productivity.
Now let's delve into the common issue of wheel wear when using ceramic tile grinding wheels. Wheel wear is the gradual erosion of the abrasive surface, resulting in reduced cutting efficiency and a poor surface finish. In order to troubleshoot and prevent wheel wear, it is important to choose the right wheel, monitor pressure, follow manufacturer guidelines, and regularly inspect for wear.
Improper usage, excessive pressure, incorrect speed, and poor quality materials are the main causes of wheel wear in grinding wheels. To prolong wheel life and minimize wear, proper wheel maintenance and storage are essential. Choose the right wheel hardness for the material being ground to prevent premature wear. Additionally, preventing wheel clogging by using coolant or lubricant can help maintain the wheel's efficiency. Regularly inspecting the wheel for wear and replacing it when necessary is also crucial for optimal performance.
To troubleshoot and prevent wheel wear in grinding wheels, it is crucial to choose the right wheel for the material and grinding operation, maintain consistent and appropriate pressure, follow manufacturer guidelines for operating speeds, and regularly inspect and replace worn wheels as needed. By implementing these troubleshooting techniques and prevention strategies, you can ensure the longevity and efficiency of your grinding wheel. To identify signs of wear, look for reduced cutting efficiency and poor surface finish. Remember to maintain consistent pressure while grinding and select appropriate materials for the task at hand.
Now let's delve into the issue of glazing that can occur with ceramic tile grinding wheels. Glazing happens when the surface of the wheel becomes smooth and glossy, resulting in a reduced grinding ability. To troubleshoot and prevent glazing, it is important to choose the right wheel bond, adjust the speed appropriately, and regularly dress the wheel to maintain its cutting effectiveness.
Insufficient aggression, wrong wheel selection, and improper speed are common causes of glazing in grinding wheels. Glazing occurs when the wheel's surface becomes smooth and glossy, reducing its grinding ability. To troubleshoot and prevent glazing, follow these tips:
When troubleshooting glazing in grinding wheels, it is important to address the common causes such as insufficient aggression, wrong wheel selection, and improper speed.
When using grinding wheels, one common issue you may encounter is loading, which occurs when the wheel's surface becomes clogged with the material being ground. This can lead to overheating, vibration, and a loss of accuracy in the grinding process. To troubleshoot and prevent loading, it is important to use suitable grinding wheels, control speed, and ensure proper lubrication. Following these tips will help maintain the efficiency and effectiveness of your grinding wheels.
Using the wrong wheel type or operating at incorrect speeds are common causes of loading in grinding wheels. Loading occurs when the wheel's surface becomes clogged with the material being ground, leading to overheating and loss of accuracy. Causes of loading include:
To prevent loading and ensure optimal performance, it is important to select the appropriate angle grinder blade, follow troubleshooting tips for wheel breakage, and choose the right grinding wheel for the task.
To troubleshoot and prevent loading issues in grinding wheels, it is crucial to use grinding wheels specifically designed for the material, adjust the wheel speed according to the operation, and apply proper lubrication to prevent material from sticking to the wheel. To troubleshoot loading issues, ensure that the grinding wheels are suitable for the task at hand, control the wheel speed to prevent overheating and material buildup, and use appropriate lubrication to reduce friction and prevent sticking. Following these prevention techniques will help avoid loading issues and maintain optimal grinding performance.
Now let's address the issue of wheel breakage, one of the common problems encountered with grinding wheels. Wheel breakage can occur due to various factors, such as excessive force, improper mounting, or structural defects in the wheel. To troubleshoot and prevent wheel breakage, it is important to use the appropriate force, ensure correct mounting, inspect the wheel before use, and follow safety protocols. By taking these precautions, you can minimize the risk of wheel breakage and ensure safe and efficient grinding operations.
Applying excessive force while grinding or using a damaged wheel can lead to wheel breakage, one of the common issues encountered with grinding wheels. To prevent wheel breakage, it is important to prioritize wheel maintenance and proper storage. Regularly inspect the wheels for cracks or other visible damage before use. Ensure correct wheel installation on the grinder to avoid incorrect mounting. By following these practices, you can enhance wheel durability and minimize the risk of wheel breakage.
When troubleshooting and preventing wheel breakage, it is crucial to use appropriate force, mount the wheel correctly, inspect it for visible damage before use, and follow safety protocols. To troubleshoot wheel breakage, ensure that you are not overloading the wheel with excessive pressure. Make sure that the wheel is mounted according to the manufacturer's instructions. Before using the wheel, inspect it for any visible damage or defects. Finally, always follow safety precautions and use the appropriate safety guards and procedures to prevent wheel breakage.
When it comes to grinding wheels, inefficient grinding can hinder productivity and prolong job completion times. There are several causes of inefficient grinding, including wheel wear, glazing, loading, and improper wheel selection. To troubleshoot and prevent inefficient grinding, it is important to choose the right wheel, monitor pressure and speed, regularly inspect for wear, and follow manufacturer guidelines. By addressing these issues, you can ensure efficient grinding and optimize productivity in your grinding operations.
One of the main causes of inefficient grinding with grinding wheels is a dull wheel surface, which hinders the wheel's ability to effectively remove material. To improve grinding efficiency and optimize grinding parameters, it is important to address this issue. Here are two key factors to consider for enhancing grinding wheel performance:
To troubleshoot and prevent inefficient grinding with grinding wheels, it is important to address common issues and implement proper maintenance and usage techniques. Some troubleshooting techniques include choosing the right wheel, monitoring pressure, following manufacturer guidelines, and regularly inspecting for wear. Additionally, improving grinding efficiency can be achieved through proper grinding wheel maintenance, such as choosing the right wheel bond, adjusting speed, regularly dressing the wheel, using suitable grinding wheels, controlling speed, and ensuring proper lubrication. These techniques will help optimize grinding techniques and prevent common grinding problems, resulting in improved grinding efficiency.
Excessive noise or vibration during grinding can be caused by various factors, including an unbalanced grinding wheel, worn-out bearings, or improper mounting. Troubleshooting and prevention tips for excessive noise or vibration include ensuring proper installation and mounting of the wheel, inspecting for wear and damage, and using the correct grinding disc for the task at hand. Regular maintenance and adherence to safety protocols will help minimize excessive noise or vibration, ensuring safe and efficient grinding operations.
The primary causes of excessive noise or vibration in grinding wheels are wheel imbalance, wheel damage, and machine misalignment.
Solutions for Excessive Noise:
Impact of Wheel Damage:
Preventive Measures for Vibration:
If you're experiencing excessive noise or vibration when using grinding wheels, troubleshooting and prevention tips can help you address these issues and ensure optimal performance. To troubleshoot excessive noise or vibration, start by balancing the wheel to ensure proper alignment. Regularly inspect the wheel for any damage or structural issues. Additionally, make sure all components of the grinder are correctly aligned. Following these troubleshooting techniques and equipment maintenance tips can help reduce noise and vibration during grinding operations.
When it comes to grinding wheels, overheating can be a common issue that affects performance and accuracy. Overheating can occur due to factors such as excessive pressure, high grinding speeds, or inadequate coolant. To troubleshoot and prevent overheating, it is important to choose the right grinding wheel for the task, use proper grinding techniques, and ensure adequate cooling and lubrication.
Overheating in grinding wheels can occur due to factors such as excessive speed, insufficient coolant, and prolonged grinding without allowing the wheel to cool. The causes of overheating can have several effects, including reduced cutting efficiency, poor surface finish, and increased wear on the wheel. Different materials may have varying levels of susceptibility to overheating, so it is important to adjust grinding parameters accordingly. Preventing overheating can help extend the lifespan of the grinding wheel and ensure optimal performance.
As we continue our discussion on grinding wheel issues, let's now focus on troubleshooting and prevention tips for the common problem of overheating. To address overheating, it is important to implement effective troubleshooting techniques and prevention strategies. This includes optimizing grinding wheel maintenance, optimizing speed and coolant usage, and utilizing appropriate cooling methods. By following these measures, you can prevent overheating and ensure the longevity and efficiency of your grinding wheels.
| Troubleshooting and Prevention Tips for Overheating |
|---|
| Optimize grinding wheel maintenance |
| Optimize speed and coolant usage |
| Utilize appropriate cooling methods |
When using a grinding wheel for ceramic tile, it is important to address the issue of uneven or rough finishes. Uneven or rough finishes can occur due to various factors such as improper wheel selection, excessive pressure or speed, or worn-out grinding wheel. To troubleshoot and prevent uneven or rough finishes, it is crucial to choose the right grinding wheel, follow manufacturer guidelines, adjust speed and pressure accordingly, and regularly inspect the wheel for wear or damage.
Using an unsuitable grinding wheel for the specific task can result in uneven or rough finishes on the surface being ground. Causes of roughness and surface imperfections include improper wheel selection, improper technique, wheel wear, and inadequate coolant. To prevent these issues and achieve a smooth surface, it is important to select the right grinding wheel for the job and ensure proper grinding wheel maintenance. Following proper techniques and using sufficient coolant can also contribute to achieving the desired surface smoothness.
To troubleshoot and prevent uneven or rough finishes when using a grinding wheel, it is crucial to ensure that you choose the right wheel for the specific task and material. Implementing troubleshooting techniques and following surface irregularities prevention measures will help achieve smooth finishes. Regularly inspect and replace worn wheels, as they can contribute to roughness. Applying adequate coolant during operation can prevent overheating and surface irregularities. By following these finishing tips and practicing smooth operation methods, you can effectively prevent roughness and achieve the desired results.
Yes, a tile grinding wheel can be used on other materials besides ceramic tiles. It is versatile and can be used on materials such as metal, concrete, ceramics, and glass. However, always follow safety tips and consider alternative cutting methods. The lifespan of a tile grinding wheel depends on usage and maintenance. It is also effective for smoothing out ceramic tile imperfections.
To ensure safety when using a tile grinding wheel, wear proper attire, including eye protection and a dust mask. Secure the workpiece and control dust by using clamps and working in a well-ventilated area.
Yes, there are alternative methods to cutting ceramic tiles besides using a grinding wheel. You can use a glass cutter, carbide tipped pen, manual tile cutter, or even a wet saw for more precise cuts and smoothing rough edges.
A tile grinding wheel typically lasts for a varying amount of time depending on factors such as usage, material being cut, and maintenance. Signs of a worn out wheel include reduced cutting efficiency and poor surface finish. Proper maintenance, such as regular inspection and cleaning, can extend the lifespan of the grinding wheel. Using high quality grinding wheels can provide benefits such as durability and a smooth finish.
Yes, a tile grinding wheel can be used to smooth out rough edges and imperfections on ceramic tiles. It provides a smooth finish and allows for precise shaping and contouring. Choosing the right grit size is important for optimal results. Avoid common mistakes by using proper technique and following tips for achieving a smooth finish.
In conclusion, ceramic tile grinding wheels are a valuable tool for achieving straight lines and smooth finishes when cutting tiles. By following the tips and techniques outlined in this guide, you can improve your tile cutting skills and achieve professional results. Whether you are a DIY enthusiast or a professional, investing in the right grinding wheel and using it effectively will make your tile cutting tasks much easier and more efficient. So, start exploring the world of tile grinding wheels and elevate your tile cutting game today!